You have mail.
- Introduction
- Read the mails with
mailormailx - No
rootuser emails? - Which programs send the mails?
- Which program displays the
You have mail.message? - Better management with
imap4dand Thunderbird - Configure Thunderbird
- Troubleshooting
Introduction
If you use a Linux operating system, you may frequently encounter the following message when logging in to your terminal:”
You have mail.
In my case, I overlooked this message for an extended period because I configured my terminal with Alacritty + Zellij, which opens instantaneously when I start a terminal window. Consequently, the message was instantly hidden, and I never saw it.
You might find yourself in a similar situation, which is not ideal because you could miss important notifications sent by programs encountering various issues.
This article aims to explain the origin of these emails, how to configure your system to ensure you never miss these notifications, and how to easily access them using Mozilla Thunderbird.
Read the mails with mail or mailx
When the message You have mail. is displayed just after you login with Bash, Ksh, Zsh or other shell it means that you have messages in one of those 2 folders:
/var/mail/$USER/var/spool/mail/$USER
On most systems the /var/spool/mail directory is a symbolic link to /var/mail.
You can read these messages using the mail or mailx command-line tools.
$ mail
Mail version 8.1.2 01/15/2001.  Type ? for help.
"/var/mail/baptiste": 1 message 1 new
>N  1 baptiste@baptiste  Thu Sep 25 22:06   20/616   Simple test
& quit
If you do not have any email you can first send a test email to yourself with the mail command.
echo "Hello world!" | mail -s "Simple test" baptiste@localhost
No root user emails?
If you are careful you may have noticed that in your system you do not have any /var/mail/root or /var/spool/mail/root file.
This suggests that the root user does not receive emails directly.
Also, if you try to send an email as root to the local root user it may be received by an other user, here is an example.
# Send an email as root to the local root user
$ sudo echo "Hello Root!" | sudo mail -s "Root test" root@localhost

# The '/var/mail' folder still contains only my main user mailbox but not the 'root' mailbox
$ ls/var/mail
baptiste

# The '/var/spool/mail' folder still contains only my main user mailbox but not the 'root' mailbox
$ ls /var/spool/mail
baptiste

# In fact the email was forwarded to my main user mailbox
$ mail
Mail version 8.1.2 01/15/2001.  Type ? for help.
"/var/mail/baptiste": 1 message 1 new
>N  1 root@baptiste      Sun Sep 28 08:02   20/577   Root test
&
The explanation about this behavior can be found here. In my case I have an /etc/aliases file containing the following line which indicates that all emails sent to the root user are forwarded to my main user baptiste.
# /etc/aliases
root: baptiste
Under Debian this file is managed by exim4, the documentation about the /etc/aliases file can be found in exim4-config_files - /etc/aliases.
Thus, root emails are not lost; they are forwarded to the main user’s mailbox, which is typically the desired behavior on a personal computer.
Which programs send the mails?
These messages are typically sent by system programs or daemons when issues arise.
Here is a non-exhaustive list of programs that can send mails:
- Cron jobs (
crond,cronie,anacron), also many custom script located in/etc/cron.daily,/etc/cron.hourly,/etc/cron.weekly,/etc/cron.monthlyuse sendmail - System loggers (
rsyslog,syslog-ng) - Security and monitoring tools (
fail2ban,logwatch) - Backup tools (
rsnapshot,duplicity) - Package managers (
apt,yum,dnf) - The Linux Kernel and Hardware monitoring tools (
smartd,mdadm.)
For example just search the “mail” keyword in the cron(8) - Linux manual page to constat that the crond Daemon is designed to send mails using sendmail by default.
You can easily test it editing your crontab with crontab -e and adding a line like the following:
MAILTO=root

* * * * * baptiste echo "Hello Baptiste!"
* * * * * root echo "Hello Baptiste!"
After one minute your should receive two mails in your local mailbox.
$ mail
Mail version 8.1.2 01/15/2001.  Type ? for help.
"/var/mail/baptiste": 2 messages 2 unread
>U  1 root@baptiste      Thu Sep 25 21:21   28/904   Cron <baptiste@baptiste> root echo "Hello Root!"
 U  2 root@baptiste      Thu Sep 25 21:21   27/862   Cron <baptiste@baptiste> baptiste echo "Hello Baptiste!"
&
Knowing which exact program could send those mails is not what’s matter the most, the important thing to understand is that when an error is encountered it can be logged in local mail boxes and it’s a good practice to have a visibility on those messages.
Which program displays the You have mail. message?
The You have mail. message is displayed by your shell.
You can get information about it in the manual page of your shell, especially the documentation of the MAILCHECK variable. Here is what is written for the MAILCHECK variable in the bash(1) - Linux manual page.
Specifies how often (in seconds) bash checks for mail. The default is 60 seconds. When it is time to check for mail, the shell does so before displaying the primary prompt. If this variable is unset, or set to a value that is not a number greater than or equal to zero, the shell disables mail checking.
You’ll get similar results with ksh(1) - Linux manual page or the Zsh manual.
As explained in those manuals if you want to disable the display of the You have mail. message at login you can set the MAILCHECK variable to 0 in your login shell configuration file (i.e. in the ~/.profile file).
# ~/.profile
unset MAILCHECK
Better management with imap4d and Thunderbird
Now that we know where the system mails are stored, how to read them with basic CLI commands, which programs are sending them and which program is displaying the You have mail. message we can improve our setup to never miss those mails.
I recommend managing these emails with Thunderbird, as it provides visual notifications for new messages.
Here I mention Thunderbird but if you prefer another mail client supporting the IMAP protocol (Evolution, Geary, Betterbird, etc.) it should work too.
In fact you’ll see that Thunderbird sadly abandoned the support of local mailboxes, that’s why I wrote this section to propose a workaround using the imap4d Daemon from the GNU Mailutils suite.
I did not tried other email clients but I suppose few of them still support local mailboxes and you do not need to continue reading this section. If your have that luck just configure your mail client to read the local mailbox located in /var/mail/$USER or /var/spool/mail/$USER and you’re ready to work with notifications and never miss important mails.
No more mail spool support in Thunderbird
As explained before I initially tried to find a way to directly read the local mailboxes located in /var/mail/$USER or /var/spool/mail/$USER with Thunderbird but it appears that in recent versions of Thunderbird the maintainers decided to remove the movemail support (see Remove movemail support).
The Bugzilla discussion initially lacked clarity, but it became evident that this change also removed support for directly reading local mailboxes in /var/mail/$USER or /var/spool/mail/$USER.
There is an open issue to reintroduce the feature, but at time of writing this article it is still not implemented, see Restore movemail / unix mailspool support in Thunderbird.
So that’s why I propose to setup our own IMAP (Internet Message Access Protocol) server with imap4d to read those local mailboxes with Thunderbird.
Create a self-signed TLS certificate for localhost
The IMAP protocol is described in the RFC 9051, as explained in this document (especially in the section 11. Security Considerations) data transits in the clear over the network, this is obviously not acceptable.
To prevent this the protocol provides 2 ways to encrypt the communications:
- Using “Implicit TLS” by connecting to the IMAP server over port
993(instead of the default port143) - Using the
STARTTLScommand on the default port143(i.e. cleartext port) to explicitly negociate a TLS connection on an established cleartext TCP connection
No matter the method used we need a TLS certificate to encrypt the communications and be sure both our credentials used during the authentication phase and the emails are not sent in cleartext over the network.
Since the imap4d server will only be exposed on localhost, I recommend creating a self-signed TLS certificate. This approach is both simple and efficient.
Here is how to do it with mkcert.
# Install a local Certificate Authority (CA) in your system and browser trust stores
$ mkcert -install
The local CA is now installed in the system trust store! ⚡
The local CA is now installed in the Firefox and/or Chrome/Chromium trust store (requires browser restart)! 🦊

# Create a self-signed TLS certificate for imap4d
$ mkcert -cert-file Baptiste_Gaillard_Imap4d.crt -key-file Baptiste_Gaillard_Imap4d.key mail.localhost imap.localhost smtp.localhost

Created a new certificate valid for the following names 📜
 - "imap.localhost"
 - "smtp.localhost"

The certificate is at "Baptiste_Gaillard_Imap4d.crt" and the key at "Baptiste_Gaillard_Imap4d.key" ✅

It will expire on 27 December 2027 🗓

# Move the certificate and key to the adequate folders
chmod 400 Baptiste_Gaillard_Imap4d.{key,crt}
sudo chown root:root Baptiste_Gaillard_Imap4d.{crt,key}
sudo mv Baptiste_Gaillard_Imap4d.crt /etc/ssl/certs/
sudo mv Baptiste_Gaillard_Imap4d.key /etc/ssl/private/
Install and configure imap4d
We’ll now install and configure an IMAP server with imap4d to read the local mailboxes located in /var/mail/$USER or /var/spool/mail/$USER.
I chose imap4d because it’s available in almost all Linux distributions, it’s simple, well documented, lightweight and a part of the GNU Mailutils suite which is a must have in Linux systems to manage mails.
Install apt packages
The first step is to install the mailutils package which contains the imap4d Daemon, in my case I’m using a Debian-based distribution so I run the following command (adapt it to your distribution if needed).
# Required to have the 'mailutils' CLI program
sudo apt install libmailutils-dev

# Required to have the 'imap4d' Daemon
sudo apt install mailutils mailutils-imap4d
During the installation of the mailutils-imap4d package, the following message appears:
...
mailutils-imap4d.service is a disabled or a static unit not running, not starting it.
...
So by default we have an imap4d service which is disabled, we can confirm this with the following commands.
# Check service file installed with the Debian package
$ dpkg -L mailutils-imap4d | grep ".service"
/usr/lib/systemd/system/mailutils-imap4d.service

# Confirm the service exists and is disabled by default
$ systemctl list-unit-files mailutils-imap4d.service
UNIT FILE                STATE    PRESET
mailutils-imap4d.service disabled enabled

1 unit files listed.
Do not enable or start the service now, we’ll do it in the next sections.
Create the imap4d configuration file
The next step is to create a Mailutils configuration file for our imap4d Daemon, here is a carefully commented example which should work (do not hesitate to read the IMAP4D Daemon documentation to understand all the options).
# /etc/mailutils.conf

program imap4d {

  # Kind of TLS encryption to use for this server
  tls-mode required;

  # Configure TLS
  tls {
    ssl-certificate-file "/etc/ssl/certs/Baptiste_Gaillard_Imap4d.crt";
    ssl-key-file "/etc/ssl/private/Baptiste_Gaillard_Imap4d.key";
  };

  # Deny connections from everywhere except localhost
  acl {
    allow 127.0.0.1;
    deny 0.0.0.0/0;
  };

  # Enforce security even more with TCP wrappers
  tcp-wrappers {
    enable yes;
    daemon "imap4d";
    allow-table "/etc/imap4d.hosts.allow";
    deny-table "/etc/imap4d.hosts.deny";
  };

  # Configure the mailbox format and location
  mailbox {
    mailbox-pattern "/var/mail/${user}";
    mailbox-type "mbox";
  };

  # As described in the documentation if the prefixes '""' is not defined in the personal namespace, the following
  # default will be automatically created:
  #
  #   prefix "" {
  #     directory "$home";
  #   };
  #
  # This is not what we want, it also cause problems giving access to all files in my home directory. So here I just
  # change this setup to use a non-existing file.
  namespace personal {
    prefix "" {
      directory "/home/${user}/.mail";
    };
  };

  server 127.0.0.1:993 {

    # Deny connections from everywhere except localhost
    acl {
      allow 127.0.0.1;
      deny 0.0.0.0/0;
    };

    # Configure TLS
    tls {
      ssl-certificate-file "/etc/ssl/certs/Baptiste_Gaillard_Imap4d.crt";
      ssl-key-file "/etc/ssl/private/Baptiste_Gaillard_Imap4d.key";
    };
  };

};
The content of the /etc/imap4d.hosts.deny file is the following.
# Deny everything by default
ALL: ALL
The content of the /etc/imap4d.hosts.allow file is the following.
# Allow only localhost and only for the imap4d program
imap4d@localhost: localhost 127.0.0.1
Start the imap4d service
We can now enable and start the imap4d service.
# Create the '~/.mail/' folder to avoid "error setting mail group: Operation not permitted" errors
mkdir ~/.mail

# Enable the imap4d service
sudo systemctl enable mailutils-imap4d.service

# Start the imap4d service
sudo systemctl start mailutils-imap4d.service

# Check the imap4d process is running
ps aux | grep imap4d

# Ensure no errors have occurred starting the imap4d Daemon
sudo journalctl -u mailutils-imap4d.service
Perform security checks
Now that our server is operational it’s a good idea to perform few security checks.
# Ensure TLS is working correctly on port 993
$ openssl s_client -connect 127.0.0.1:993
Connecting to 127.0.0.1
CONNECTED(00000003)
...
SSL handshake has read 1707 bytes and written 1643 bytes
Verification: OK
...
New, TLSv1.3, Cipher is TLS_AES_256_GCM_SHA384
Protocol: TLSv1.3
...
Verify return code: 0 (ok)
---
* OK IMAP4rev1
...

# Ensure we listen only on 127.0.0.1, it's ok if the "Local Address" column equals '127.0.0.1:993'
$ netstat -tuln | grep 143

# Ensure our ACLs accept requests from localhost and deny requests from an other IP address
#
# @see https://mailutils.org/manual/html_section/mailutils.html#mailutils-acl
$ sudo mailutils acl --file=/etc/mailutils.conf --path=.program=imap4d.acl 127.0.0.1
Testing 127.0.0.1:
127.0.0.1: accept

$ sudo mailutils acl --file=/etc/mailutils.conf --path=.program=imap4d.acl 192.168.1.1
Testing 192.168.1.1:
192.168.1.1: deny
Configure Thunderbird
The final step is to configure Thunderbird to read our local mailboxes through our imap4d server.
Import the mkcert Root CA in Thunderbird
First, import the mkcert Root CA into Thunderbird to prevent TLS errors, as we are using a self-signed certificate.
To do it open Thunderbird and go to Settings -> Privacy & Security -> Certificates -> Manage Certificates....
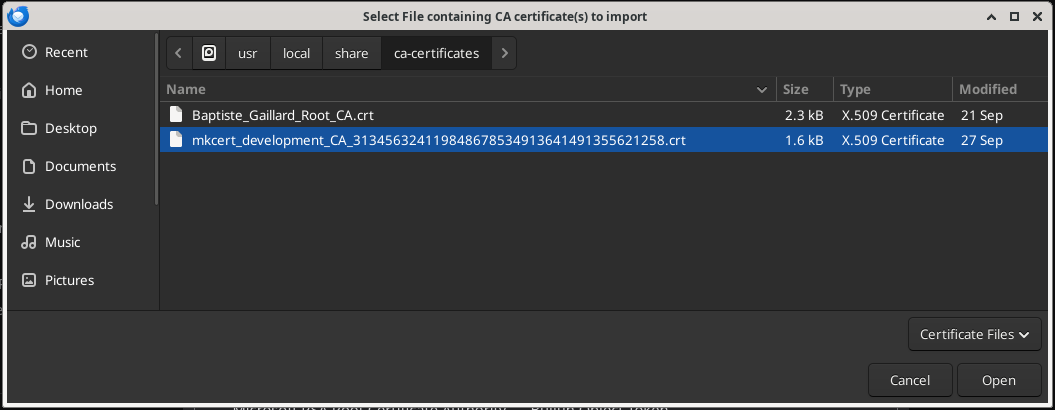
In the Authorities tab click on the Import... button and select the mkcert Root CA certificate file located in the /usr/local/share/ca-certificates folder. The file has a name like mkcert_development_CA_xxxxxxxx.crt.
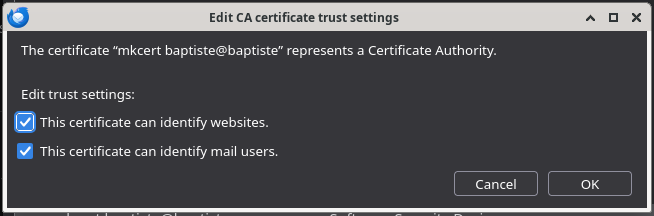
After clicking on the import button a dialog appears, here do not miss to check the 2 checkboxes and click on the OK button.
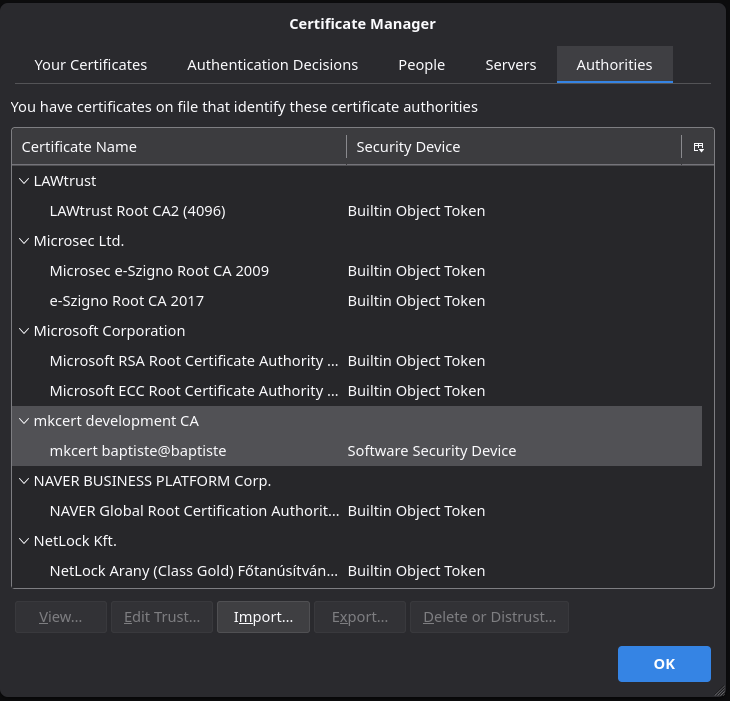
After import you should see the new imported Root CA certificate in the list.
You can now continue to the next step to create a new mail account in Thunderbird.
Create a new mail account
Open Thunderbird and select the New Account -> Mail account... option. On the first window enter your name and your local email address (i.e. {linux_username}@localhost).

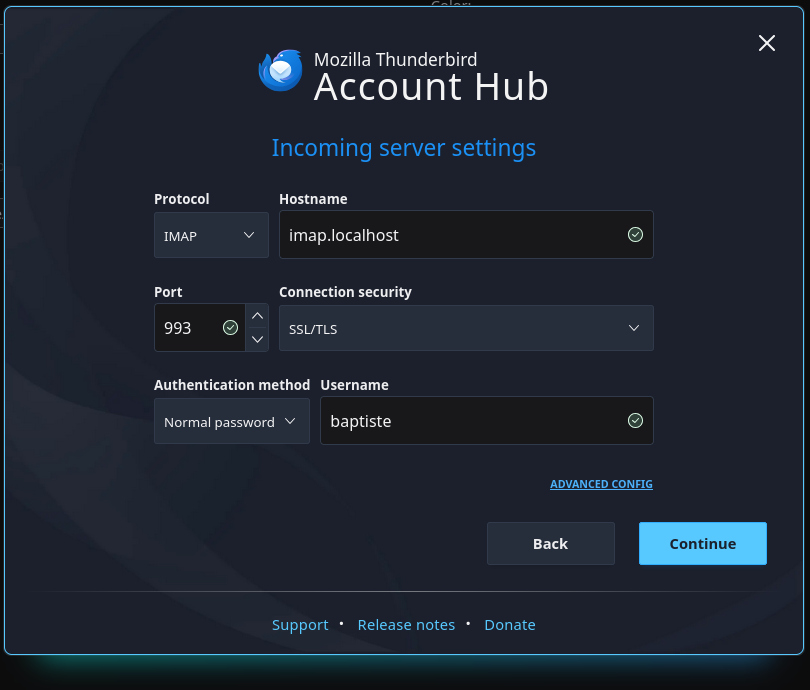
On the next window the connection to the IMAP server should succeed, the authentication must be SSL/TLS. At that step click on the EDIT CONFIGURATION link.
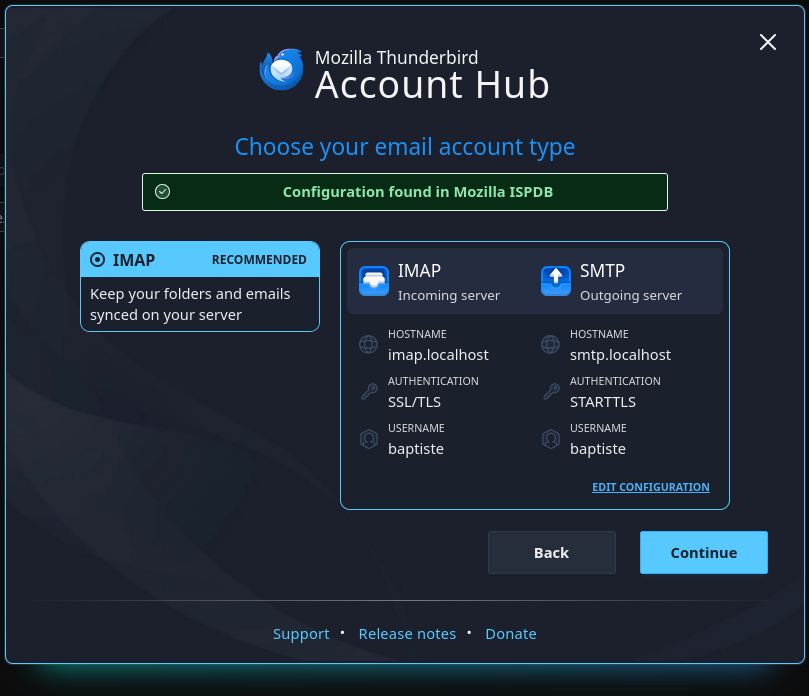
This window should indicate the port 993 and SSL/TLS, change the authentication method to Normal password if it’s not already the case.
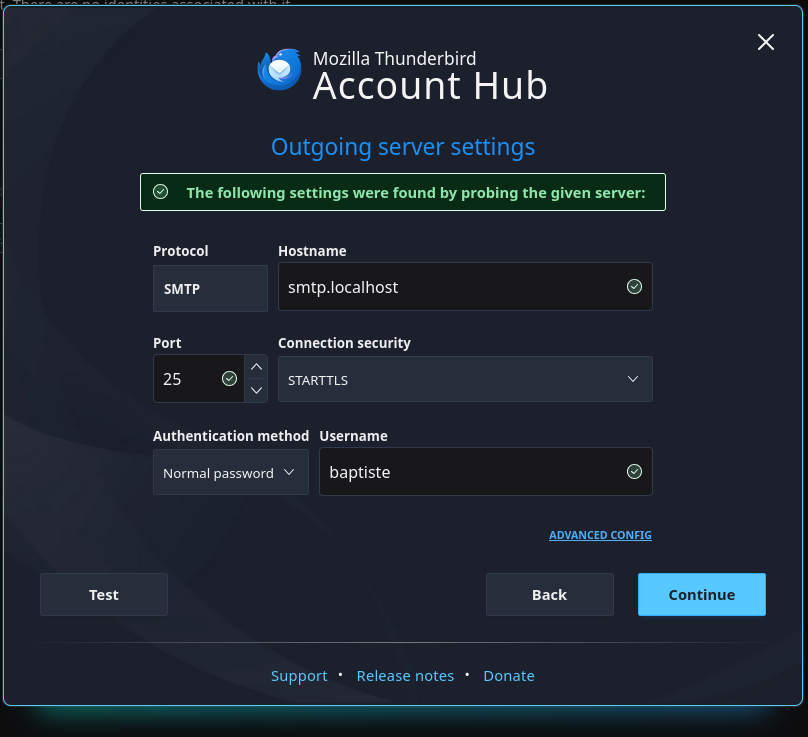
The SMTP window should be automatically filled and work, in my case I’m using Debian and there is a default SMTP server configured with Exim4 listening on localhost:25.
If this step does not work this is not really important for our needs because for local mails we principally want to be notified and read them, we do not really need to send mails.
On the next window enter your password, click next, next, next until the end of the wizard.
Everything should be working now, you can try to send a test email to yourself with the mail command and check that you receive a notification in Thunderbird.
echo "Hello world!" | mail -s "Simple test" baptiste@localhost
Troubleshooting
.localhost Hostname empty or invalid
You see an error message like the following:

This issue may result from one of the following:
- You miss to import the
mkcertRoot CA certificate in Thunderbird - You miss to check the
Trust this CA to identify websitescheckbox when importing themkcertRoot CA certificate in Thunderbird